
Welcome
Getting subs to fire at the audience and not at the stage is one of the most useful things you can do to a system, and one of the most fiddly to work out on the day. The maths is not hard, but it is exactly the sort of arithmetic nobody wants to be doing on a loading dock with the band waiting.
Sub Array Designer does it for you. Tell it which technique you want to use, how many cabinets you have and how they are spaced, and it works out a delay time and a polarity for every single box from the geometry and the speed of sound. While you type it draws the array from above, predicts the coverage, and builds a table of exactly what to dial into your processor.
Getting started
You can have a usable design in about a minute.
- Pick your English and your units. The very first screen asks for both: UK or US English, and Metric or Imperial. Both can be changed later in Settings.
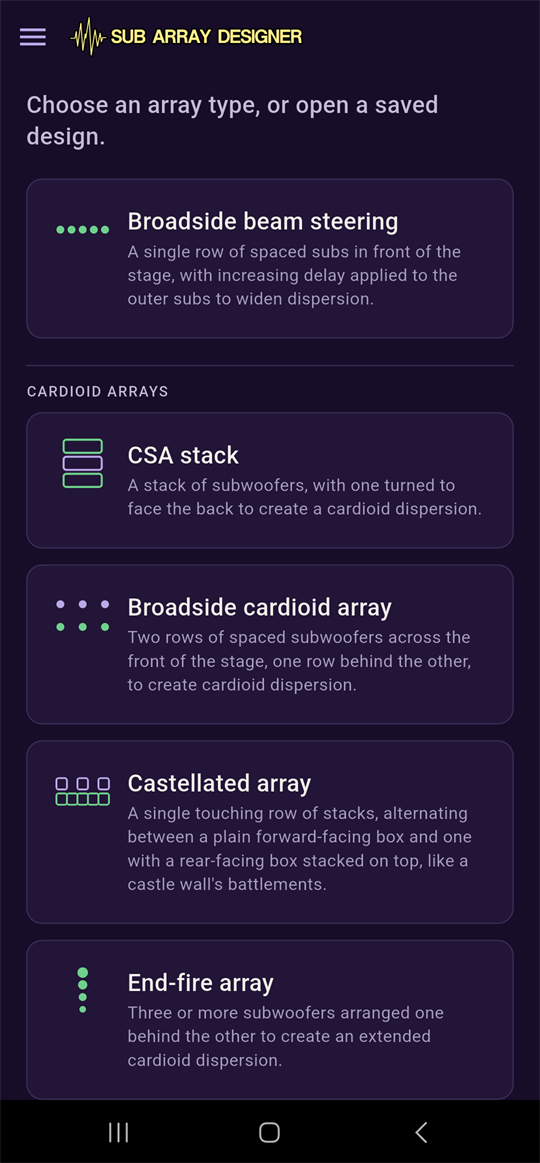
- Open the app and you land straight on the array type picker. There is no setup to get through first.
- Pick a technique. If you are not sure which, start with CSA stack: three boxes, one of them turned round, and it works almost anywhere. Array type reference covers what each one is for and what it needs.
- Type in your cabinets. Each design screen asks for only what that technique actually needs, usually a count, a spacing and a cabinet depth. Measure the depth of your sub and put that in; it matters more than you might expect.
- Watch the diagram. It redraws as you type, with no button to press. The stage is at the top and the audience at the bottom, and the coloured heat map underneath the boxes is the predicted coverage.
- Check the frequency. Set the coverage map frequency to something you actually care about, usually somewhere around 50 to 80 Hz, and look at the Attenuation figure. A healthy cardioid array should be showing you a decent negative number, which means the stage side is quieter than the audience side.
- Read off the delay table. Every cabinet is listed with the delay to add, whether to invert its polarity, and where to put it. One box will be at 0.00 ms in grey: that is the reference, and everything else is timed against it.
- Get it out of the phone. Tap Share Design to send the whole table out as plain text, into a message or a show file, so you are not squinting at a screen while patching a processor. Print or save a PDF gives you the diagram and the table together on one A4 page, with every cabinet on the picture labelled to match its row — the one to use if you are working the design out in advance and want it on paper on site. Save Design keeps it in the app to open again next time.
- Set your temperature. Before a show that matters, put the actual temperature into Settings. The speed of sound drives every delay time in the app, and a cold evening and a hot afternoon are not the same number.
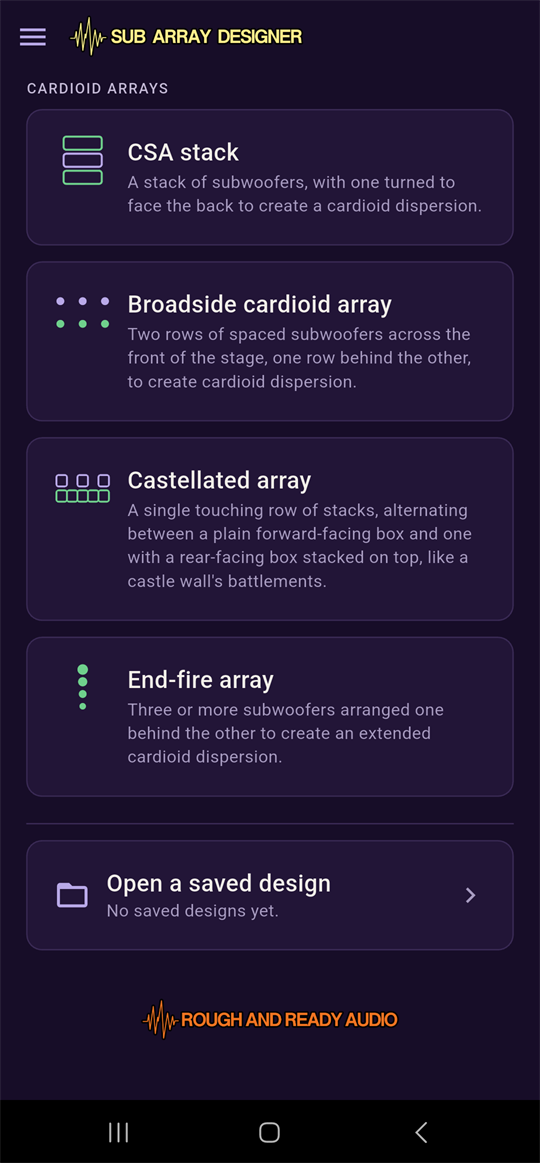
Array types on the home screen are grouped by whether they reject sound towards the stage. Broadside beam steering sits on its own at the top, because it only widens forward coverage. While a great technique, it doesn't provide a cardioid dispersion. Everything under Cardioid arrays combines the subs in a way that projects the sound towards the audience while cancelling it out as much as possible behind at the stage.
The different setups have their own advantages and disadvantages in terms of how much sound they can cancel, how much physical space they take up, and how many processing channels you need to achieve them. Pick the right set of compromises for each situation.
Free and Pro
Sub Array Designer is free to download, and the two free array types are complete working designs rather than limited previews. You can take either of them to a show tonight.
- Sub Array Designer includes Broadside beam steering and the CSA stack, both fully functional, with the live diagram, the coverage prediction, the full delay table, saving and sharing, and all the settings.
- Sub Array Designer Pro unlocks the Broadside cardioid array, the Castellated array and the End-fire array, along with the ability to arrange CSA stacks as a broadside array, to add beam steering to a cardioid row, and to print a design or save it as a PDF.
The locked array types stay on the home screen with their full descriptions, dimmed slightly and carrying a small amber Unlock to use badge, so you can read what each one does before deciding whether you need it. Tapping one explains that it is a full-version feature and points you at Settings. Print behaves the same way: the button is on the card for everyone, with the badge under it on the free version. The unlock is a single one-off purchase for this app on this device rather than a subscription, and it lives on a card at the top of the Settings screen with a Restore purchase button underneath.
The Design screen
Every array type opens onto the same shape of screen: a diagram pinned at the top that updates live as you type, and a scrolling list of inputs and results underneath it. Nothing you change needs a button press. The diagram, the coverage map and the delay table all recompute as you edit a field.
The diagram and coverage map
The diagram is a top-down plan view, showing the array as it would sit on (or in front of) a stage looking down from above, with the stage at the top and the audience at the bottom.
Underneath the cabinets is the predicted coverage, drawn as a heat map. Green is the quietest part of the useful range, fading up through yellow and orange to red at the loudest cell, with very quiet areas fading further towards black. On a working cardioid array you should be able to see the difference at a glance: bright in front of the boxes, dark behind them.
The cabinet outlines tell you what each box is doing.
- Green outline
- an ordinary cabinet, whichever way it faces.
- Red outline
- Castellated array only. A stack with a rear-facing box hidden on top of the visible one.
A CSA stack draws as a single box rather than three, because its boxes are physically stacked one above another and share one footprint when you look down at them. A Castellated array's double stacks collapse the same way, but they stay level with the row's single stacks rather than shifting backwards, because the row is meant to read as one flush line of touching cabinets.
Frequency, cancels at, attenuation
Three readouts sit just below the diagram, and between them they tell you whether the design is doing its job.
- Coverage map frequency
- Which frequency the heat map above is drawn at. Changing this does not change the design at all; it only changes which frequency's pattern you are looking at. Move it around, because a cardioid array is not equally good at every frequency and you should know where yours falls off.
- Cancels at
- The frequency this design's front-to-rear spacing is actually tuned to cancel, which is a quarter wavelength of that physical spacing. Every cardioid type shows it. Broadside beam steering does not, because it has no rear box to cancel against.
- Attenuation
- The predicted difference between the stage side and the audience side, at whichever frequency the coverage map is set to. A negative number means the stage side is quieter, which is exactly what you are after. See Understanding your results for what counts as a good figure.
Zoom controls
The plus and minus pair over the diagram's bottom-right corner zoom the coverage window in and out. The array itself stays pinned in the same place on screen; all that changes is how much of the surrounding coverage you can see. Zoom in to see the details of the subwoofer box setup, zoom out to see the overall coverage pattern they are generating.
Tap once to step, or hold either button down to keep stepping, with a short pause after the first step and then continuous movement until you let go.
The cabinet delay table
This is the part you actually take to the processor. Every cabinet the design produces gets a row.
| Column | What it means |
|---|---|
| Cabinet | Which box, labelled by its role: Front/Rear, Sub 1/2/3, Stack 1 front, and so on. |
| Delay (ms) | How much delay to add to that box on your processor. One row will be greyed out at 0.00, and that is the reference every other box is timed against. |
| Phase invert | Whether that box's polarity needs flipping. |
| Position (m) | Where it sits. Centred on the array for row-based types, or measured from the audience for end-fire. Each type's own page says exactly what it is measuring. |
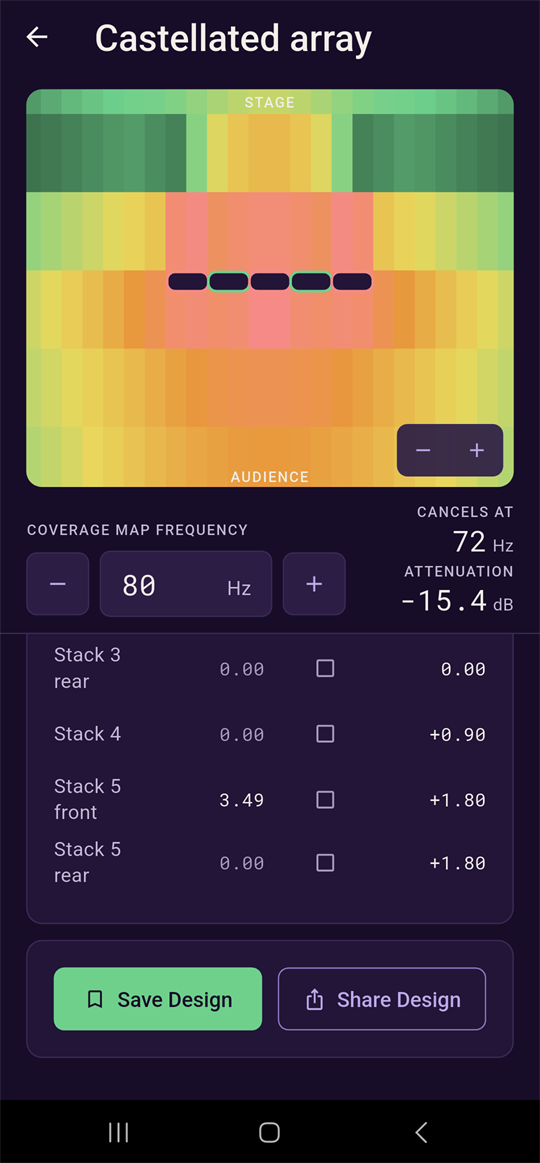
On the Castellated array screen the rows are spaced to show you the structure at a glance: a small gap between a stack's own front and rear rows, and a larger gap before the next stack begins.
Saving, recalling and sharing
A card at the bottom of every Design screen carries three buttons: Save Design and Share Design side by side, with Print underneath them.
- Save Design
- Saves the current design under a name you choose, so you can reopen it from "Open a saved design" on the home screen. Worth doing for any rig you use regularly, so that next time it is a two-tap job.
- Share Design
- Exports the cabinet delay table as a plain-text channel list, with the cabinet, delay, phase invert and position for each box, through the phone's normal share sheet. Paste it into a message, an email, a show file, or whatever you use to keep notes. This is far easier than reading numbers off a screen while somebody else types them in.
- Print or save a PDF
- Builds a single A4 page of the whole design and hands it to Android's own print system, which can send it to a printer or save it as a PDF file. This is the one to use when you have worked a design out at home and want to walk onto site with it on paper. A Pro feature; on the free version the button carries an Unlock to use badge.
What the printed page shows
The top half is the plan: the same diagram and coverage map the Design screen is showing, at the same zoom, with every cabinet labelled. Those labels are the point of it — "Sub 3" on the picture is the "Sub 3" row in the table underneath, so there is never any doubt which box on the ground gets which delay. Under the plan sits the frequency the coverage was drawn at, the predicted rear attenuation, and the cancellation frequency.
The bottom half is the paperwork. Design summary lists what you actually typed in: the counts, the spacings, the priority, whether beam steering is on and at what angle, and the speed of sound the delays were worked out at. Cabinet delays is the full table — cabinet, delay, whether to invert, and position. A long channel list carries on onto a second page, with the table's headings repeated.
Reference
Array type reference
One page per technique the picker offers. Each one covers what the technique is for, the inputs that screen asks you for, and what the diagram and the delay table mean for that layout in particular.
Broadside beam steering
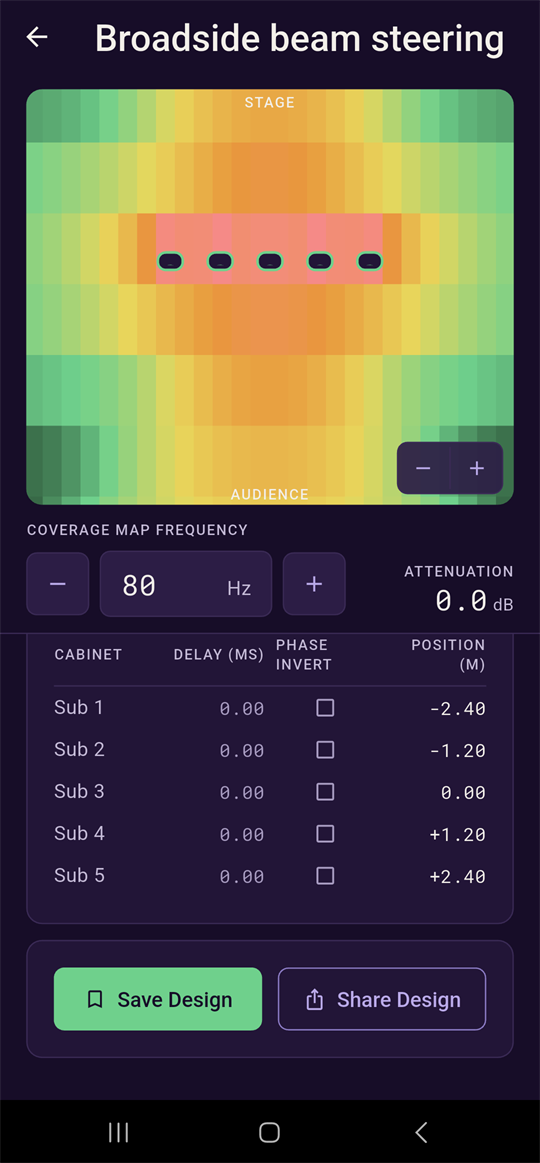
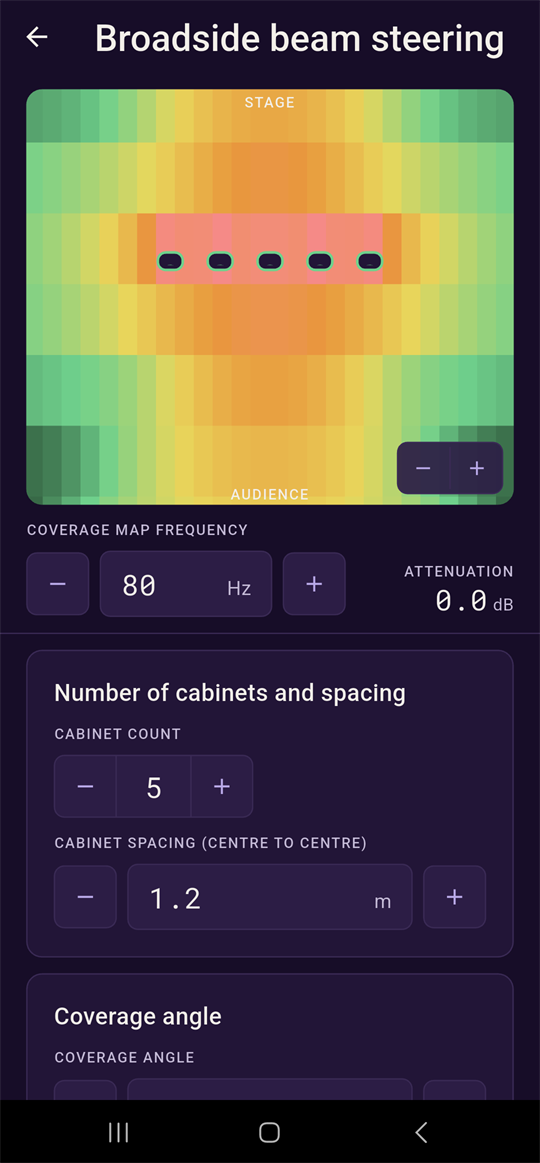
A single row of evenly spaced, forward-facing subwoofers will provide a very narrow coverage area. It will be very loud in a straight line in front of the stage, but will fall off quickly as you move left or right. By adding progressively more delay to the outer cabinets you can steer and widen the coverage, making things much more even across the audience area.
This is the odd one out, because it is not a cardioid technique at all. Every box faces the audience, so there is no rear rejection.
| Field | What it sets |
|---|---|
| Cabinet count | How many subs are in the row. |
| Cabinet spacing (centre to centre) | The lateral spacing between adjacent boxes. This gets checked against the spatial aliasing limit once steering is applied. |
| Coverage angle | 0° fires the whole row straight forward with no delay at all. Wider angles spread the coverage further out from the centre by delaying the outer cabinets progressively more. |
Cabinet delays run from Sub 1 at one edge of the row through to the last cabinet at the other. With the angle at 0° they all sit at 0.00 ms, and the delay column only starts moving once you set a coverage angle.
CSA stack
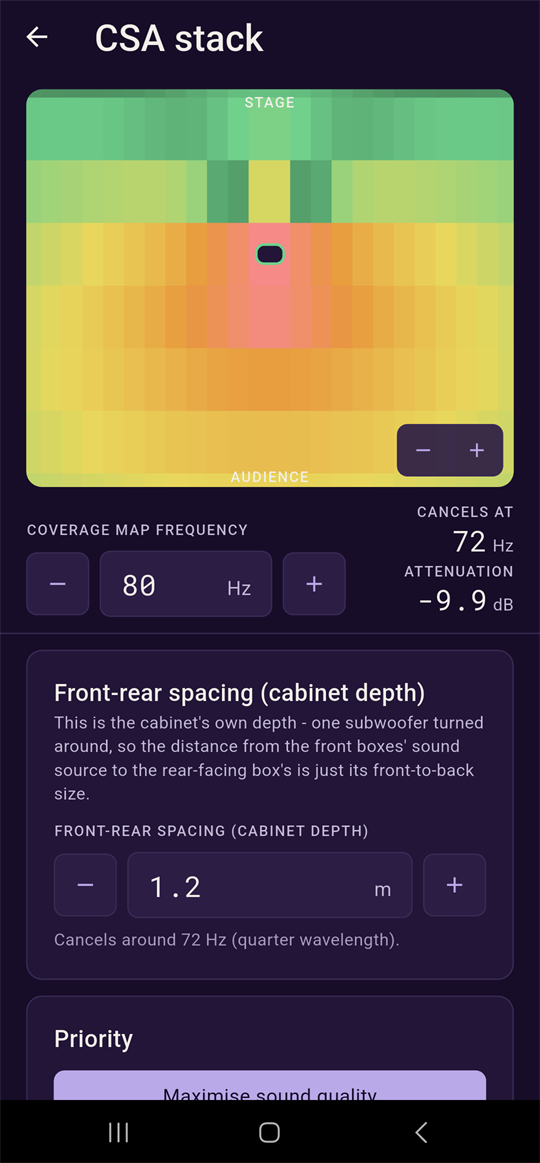
The classic inverted-stack cardioid array, and the one to start with if you have never built one. A stack of three boxes, with one of them reversed to face the stage. That rear box gets its own delay and, depending on the Priority mode, a polarity flip, and between them those two things cancel a great deal of low end behind the stack.
It needs three boxes and some extra processing, but nothing else. It takes up no more floor space than one sub, and it is the reason so many stages have subs in threes.
| Field | What it sets |
|---|---|
| Front-rear spacing (cabinet depth) | Your cabinet's own front-to-back measurement. Because the rear box is really just one of your subwoofers turned around, this is the distance from the front boxes' sound source to the rear-facing box's. Measure the actual cabinet rather than guessing. |
The results table collapses the two identical front boxes into a single "Front-facing" row alongside "Rear-facing", because listing both front boxes separately would just repeat the same figures twice.
Arranging as a broadside array
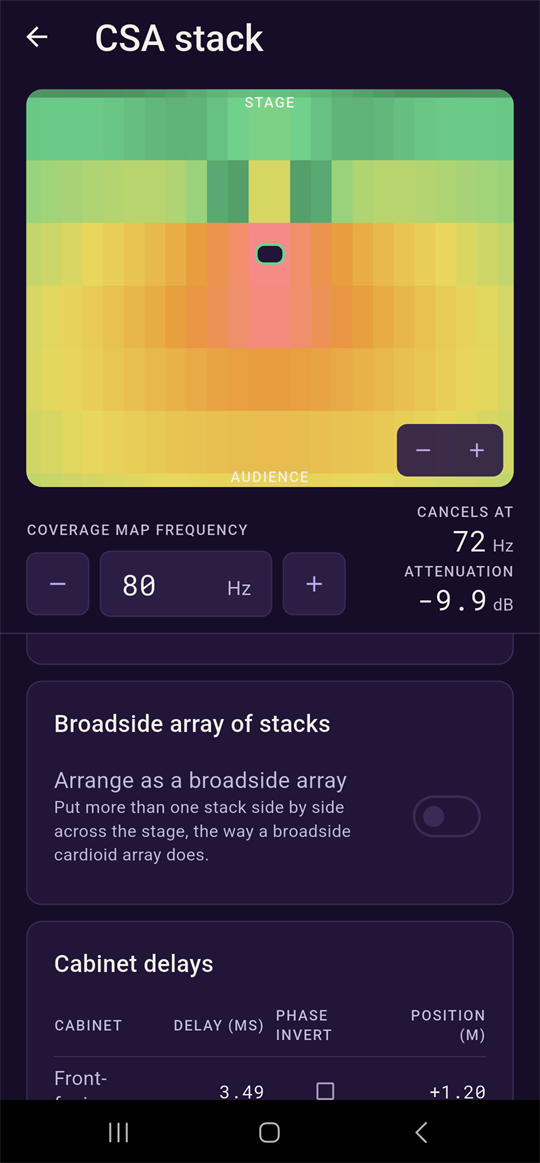
Ticking Arrange as a broadside array puts more than one CSA stack side by side across the stage. As well as it's cardioid cancellation, you can then also apply the same processing as a Broadside cardioid array, so the same engine and the same delay scheme take over, and a Number of stacks field and a Stack spacing field appear in place of the single-stack view. Pro
With that switch on, a further Add beam steering switch appears. Turning that on steers the whole broadside row into a curve, on top of its own cardioid timing. Pro
Broadside cardioid array
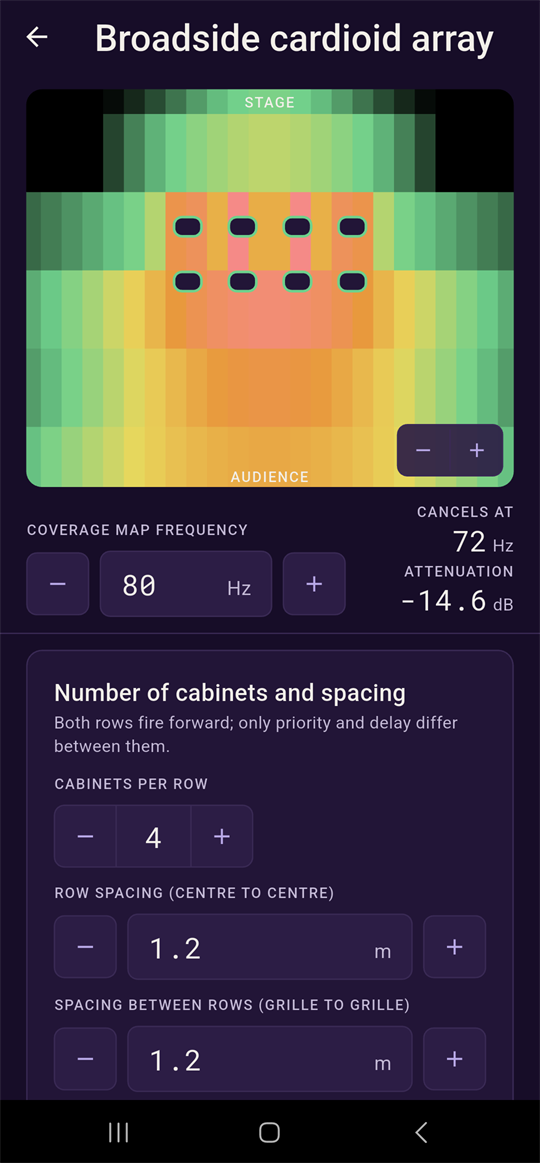
Two rows of spaced subwoofers across the front of the stage, one row behind the other. Every column is a front and rear pair, and every box faces forward: only the priority and the delay differ between the two rows.
This is the technique for when you have plenty of stage depth, and you want even low end across a wide audience with proper rejection behind. It costs you floor space compared with a CSA stack, but it gives you more effective cancellation and a more even result across the width of the room. Pro
| Field | What it sets |
|---|---|
| Cabinets per row | How many columns across the stage. |
| Row spacing (centre to centre) | The lateral spacing between adjacent columns. |
| Spacing between rows (grille to grille) | The front-to-back offset between the two rows, which is the cardioid pair's own spacing and what sets the cancellation frequency. |
The results table lists every front-row cabinet before any rear-row cabinet, so Front 1 through Front 4 and then Rear 1 through Rear 4, rather than alternating pair by pair. Positions are centred on 0 across the row.
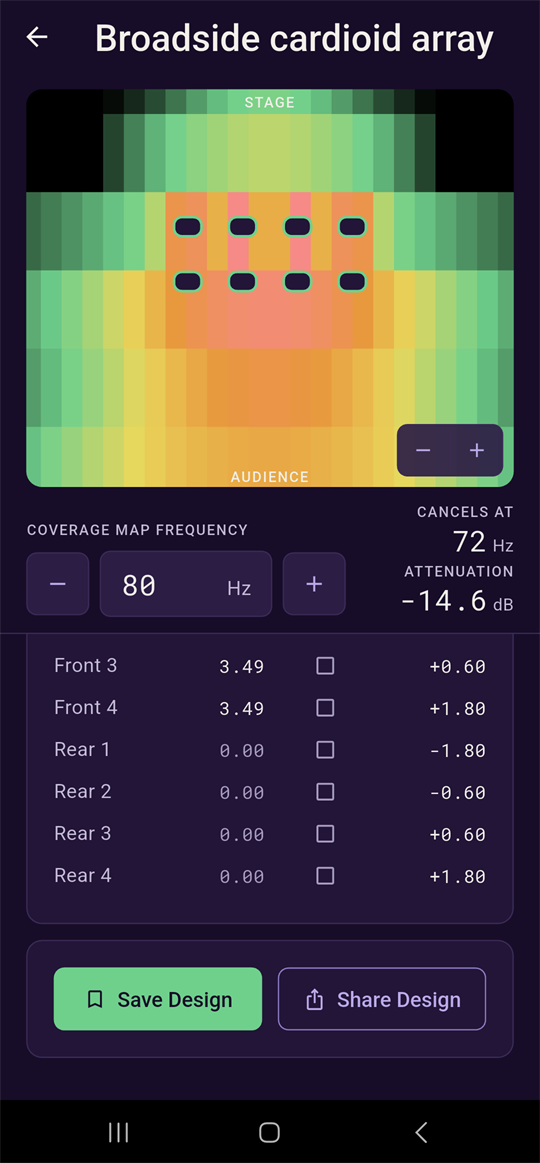
A Beam steering card appears below, with the same Add beam steering switch as the CSA stack screen, curving the row into a steered arc on top of its cardioid timing.
Castellated array
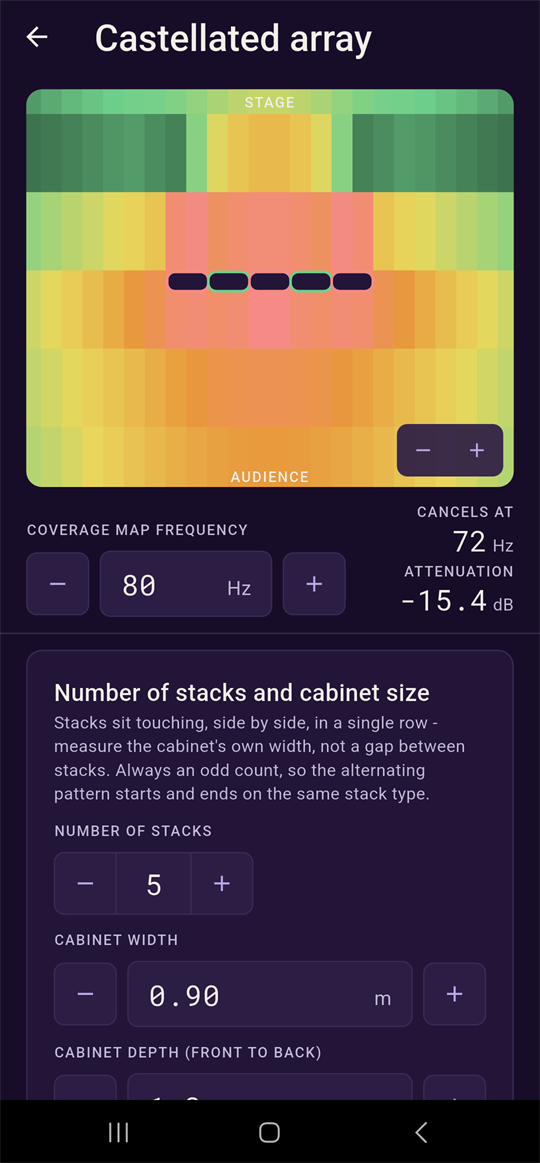
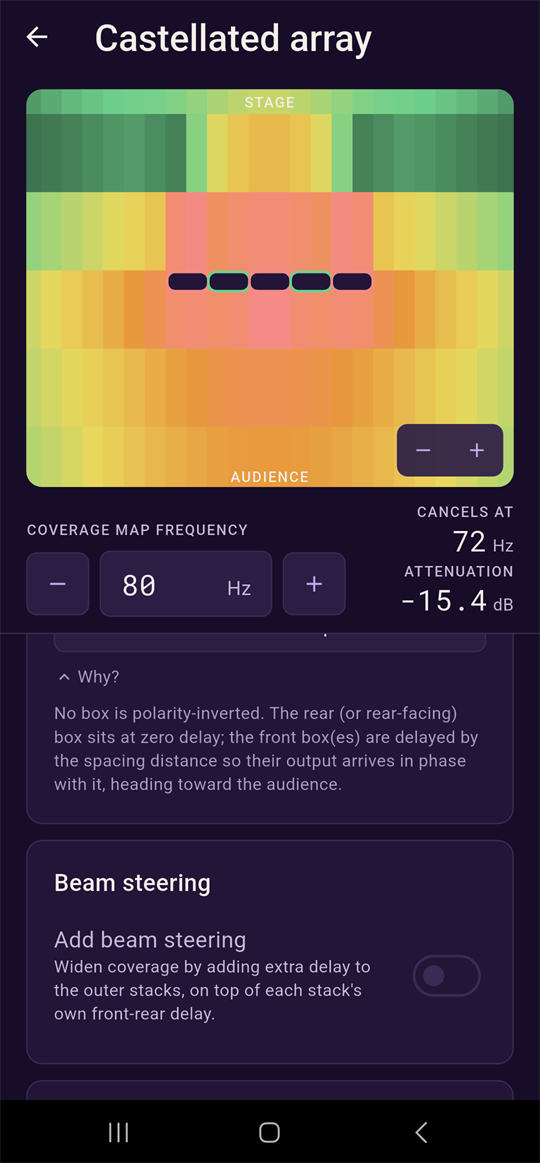
A single touching row of stacks across the stage front, alternating between a plain forward-facing box and one with a rear-facing box stacked on top of it, like the battlements on a castle wall. Every other stack forms a cardioid pair using exactly the same maths as a CSA stack, and the plain stacks in between have no rear partner, so they fire undelayed and the right way round.
The appeal is that it gives you cardioid behaviour from a single flush row of cabinets, with no second row eating into the stage. If depth is what you are short of, this is the one to look at. Pro
| Field | What it sets |
|---|---|
| Number of stacks | Always an odd number, so the stepper moves in twos. That way the alternating pattern starts and ends on the same stack type. |
| Cabinet width | The stacks sit touching, so this is both the column spacing and the cabinet's own width. |
| Cabinet depth (front to back) | The front-to-back offset the paired stacks' cardioid timing is built from. It is the same measurement the CSA stack's front-rear spacing asks for. |
Array ends chooses which stack type sits at both ends of the row.
- Bookend
- The two end stacks are the front and rear pairs, two boxes high.
- Buttress
- The two end stacks are the plain single boxes, one box high.
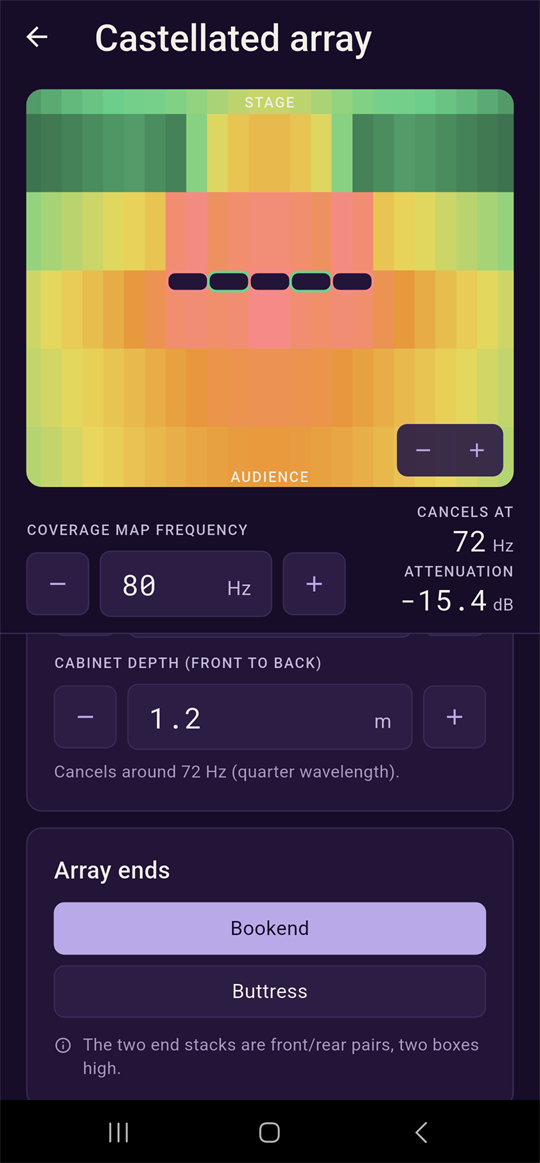
Results are labelled by stack. A plain stack takes one row, such as "Stack 2", and a paired stack takes two, "Stack 3 front" and "Stack 3 rear". Position is each stack's centre, measured from the middle of the row. See The cabinet delay table for how the rows are spaced to show the pairing.
A Beam steering card at the bottom works the same way as on the other cardioid types. Castellated is unusual in that it never remaps to a different array type when beam steering is switched on, because its own design already carries the steering geometry.
End-fire array
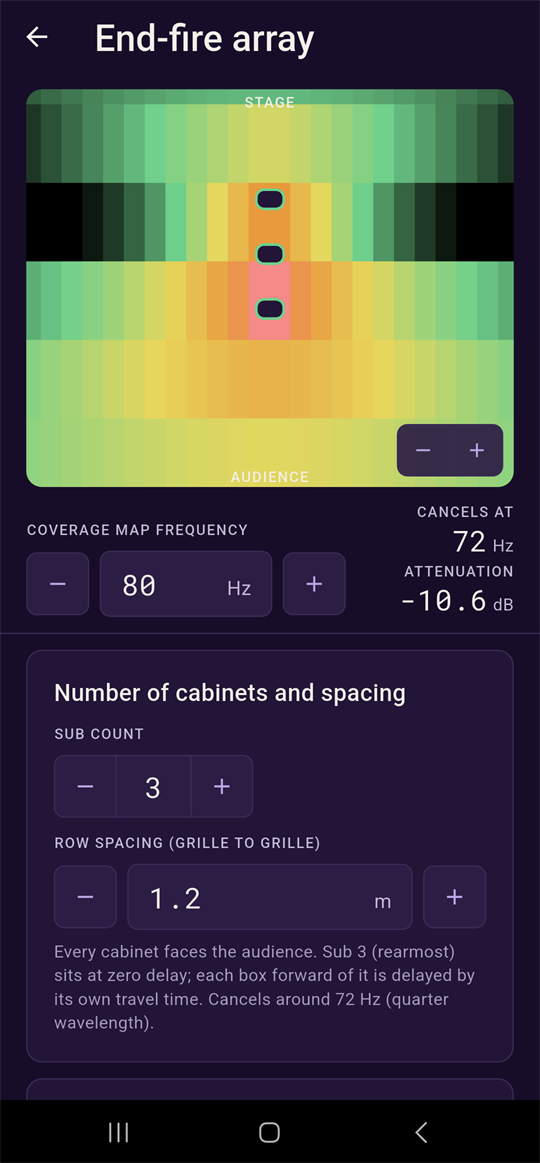
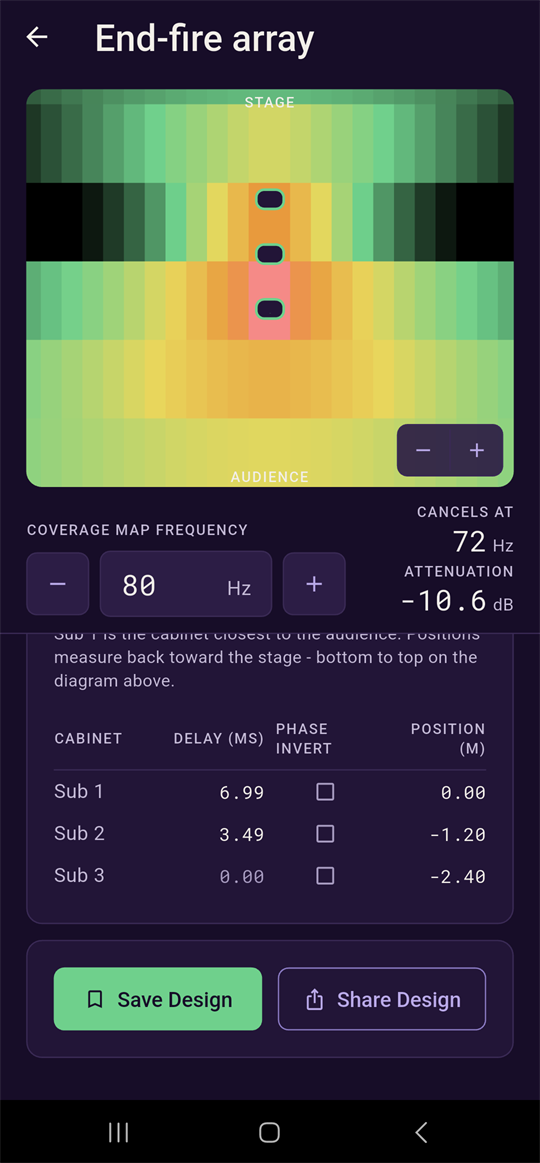
Two to four subwoofers arranged one behind the other, all facing the audience. No box is ever turned around.
The rejection here comes from timing alone, which is what makes it so elegant. The rearmost cabinet, nearest the stage, fires undelayed, and each cabinet in front of it is delayed by its own travel time. Heading towards the audience, every box's output arrives at the same moment and adds up. Heading back towards the stage, they arrive increasingly out of step with each other and cancel.
It needs depth rather than width, so it suits a stage with room in front of it or a festival deck where you can run boxes back. It also tends to give the deepest and most consistent rejection of any of these techniques. Pro
| Field | What it sets |
|---|---|
| Sub count | Two to four cabinets. |
| Row spacing (grille to grille) | The distance between adjacent cabinets in the line. |
Positions are measured from Sub 1, the frontmost cabinet closest to the audience, back towards the stage. That is bottom to top on the diagram above, and it is how somebody on site actually paces the line out.
Priority: sound quality against cardioid pattern
Every cardioid type except End-fire offers the same choice, because underneath it is the same front and rear pair maths every time. It is a genuine trade rather than a right and a wrong answer, and which one you want depends on what the night needs.
- Maximise sound quality
- No box is polarity-inverted. The rear-facing box sits at zero delay, and the front boxes are delayed by the spacing distance so that their output arrives in step with it heading towards the audience. You get full forward output and the best sound quality and transient punch, at the cost of a rear null that is slightly less deep than the other mode can manage. This is the one for a music show where the low end has to hit.
- Maximise cardioid pattern
- The rear boxes are delayed and polarity-inverted instead, timed for the deepest null that geometry allows directly behind the array. You trade a small dip in forward headroom and sound for the tightest stage rejection available. This is the one for a noise-sensitive site, an unhappy neighbour, or a stage where the drummer cannot hear anything for the subs.
The explanation for whichever mode you have selected sits under a collapsed Why? row rather than staying permanently on screen. Tap it when you want to think the trade through, and leave it closed the rest of the time.
Settings
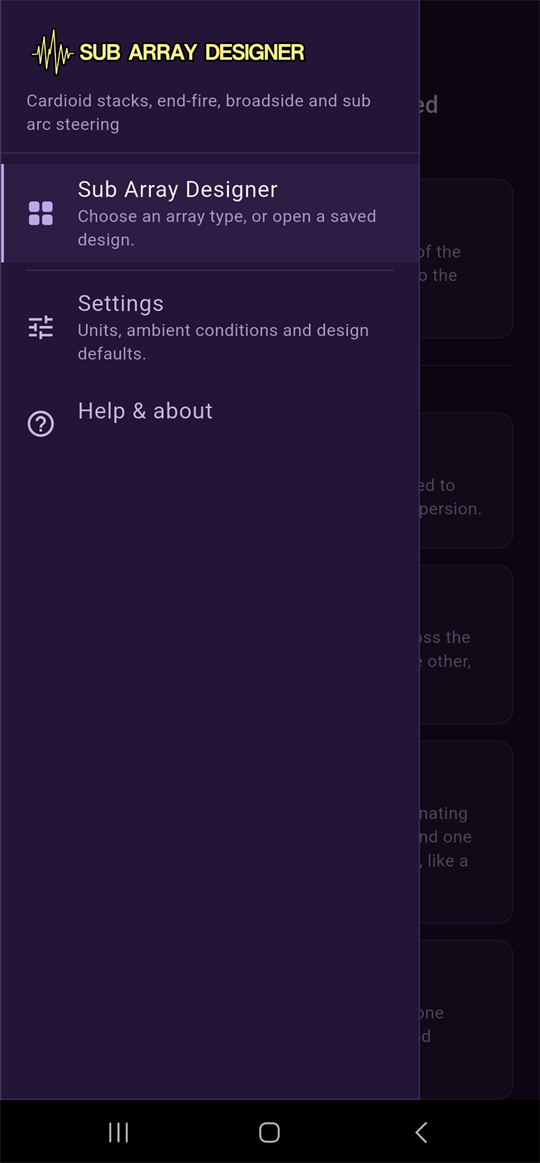
Reached from the navigation drawer, using the icon at the top left. There is not much here, but the temperature setting matters more than any other single number in the app.
- Language & region
- UK or US English, for the whole app. This is the choice you made on first launch, and changing it here only affects spelling.
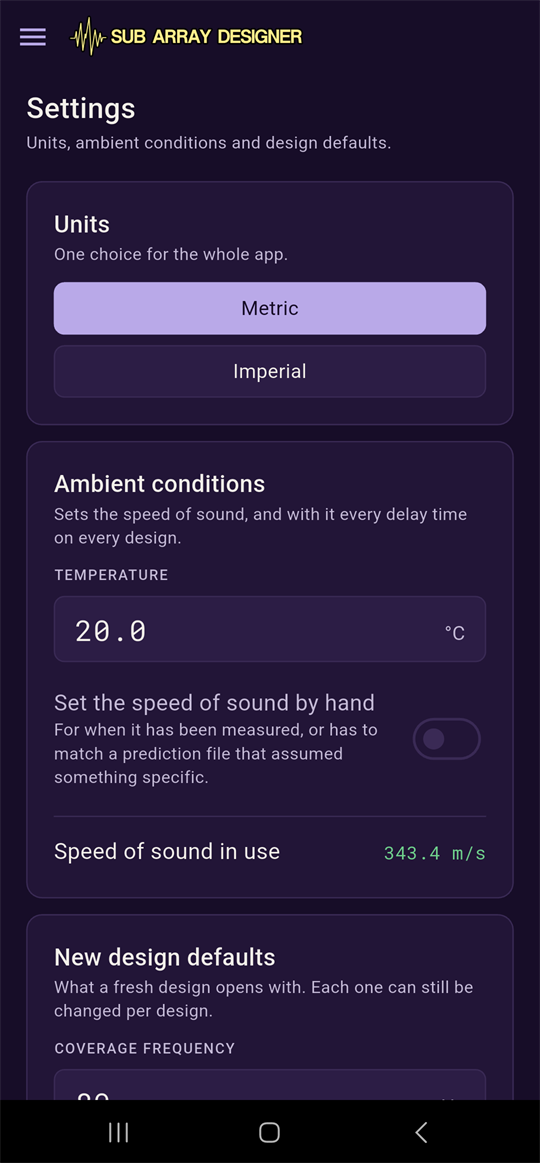
- Units
- Metric or Imperial, for the whole app. Every spacing and depth is typed and read back in whichever you pick, and switching converts what you have already entered rather than leaving the number and swapping the label, so a 1.2 m spacing becomes 3.94 ft rather than silently becoming 1.2 ft.
- Ambient conditions: temperature
- This sets the speed of sound used for every delay time on every design. The familiar 343 m/s figure is only right at 20 °C, and an outdoor show on a cold night is a noticeably different number. Put in what it is actually going to be at showtime.
- Set the speed of sound by hand
- A switch that replaces the temperature-derived figure with one you type in directly, for when you have measured it, or when it has to match a prediction file that assumed something specific.
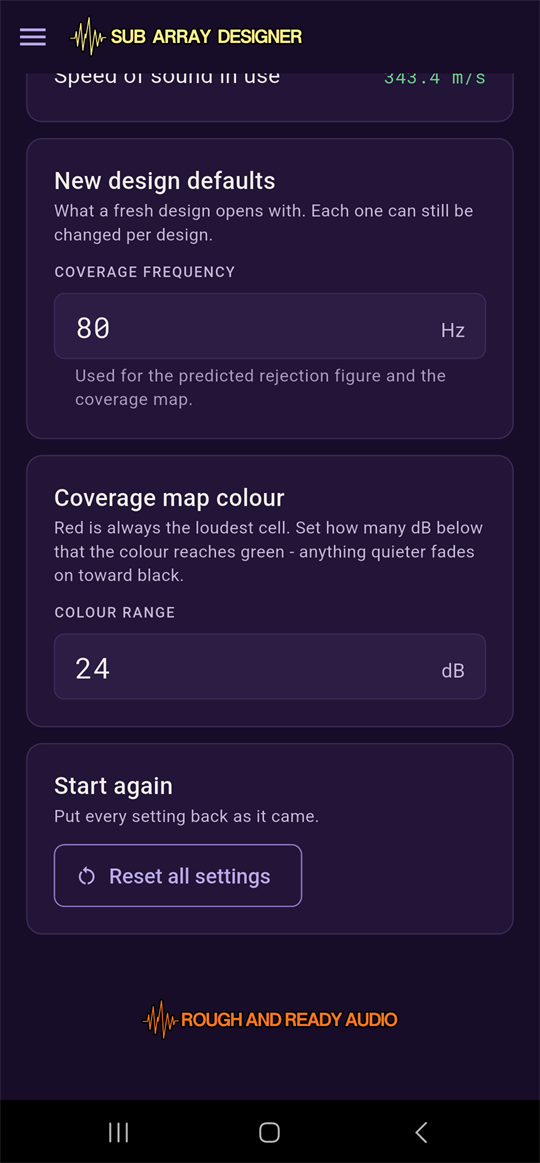
- New design defaults
- The coverage frequency a fresh design opens with. Any individual design can still change it afterwards.
- Coverage map colour
- How many dB below the loudest cell the heat map reaches green. Anything quieter than that fades further towards black. Red is always the loudest cell, whatever range you choose. Widen it if the map looks too uniform to read, narrow it to bring out fine differences.
- Speed of sound in use
- Not a setting, just a read-back of the figure your temperature works out to, so you can sanity-check it at a glance.
- Start again
- Puts every setting on this screen back as it came.
Understanding your results
The predicted rejection figure and the coverage map both come from the same calculation: a free-field, coherent sum of the array's cabinets treated as ideal point sources, using only their positions, delays and polarities.
Attenuation is the predicted difference between the stage side and the audience side, at whatever frequency the coverage map is set to. Negative means the stage side is quieter, which is a working cardioid array doing its job. A typical well-spaced pair predicts somewhere between 15 and 25 dB of rejection at its design frequency. If yours is showing very little, check the Priority mode and check how far the coverage frequency has drifted from the "Cancels at" figure.
Cancels at is a quarter-wavelength calculation from the front-to-rear spacing alone. It is where the cardioid pair's cancellation is deepest, and it is independent of whichever coverage map frequency happens to be showing. Rejection falls away as you move away from it in either direction, which is why no cardioid array is equally good across the whole sub range.
Broadside and arc-steered types are also checked against the spatial aliasing limit. Cabinets spaced more than half a wavelength apart at the reference frequency stop behaving as one coherent source and start producing extra, unwanted lobes pointing in directions you did not ask for. A warning chip appears above the diagram when a design gets close to or goes over that limit. Reduce the spacing, or accept that the pattern will get untidy at the top of the sub range.
Troubleshooting
My predicted rejection looks weak, or the null is not where I expected
Check the Priority mode first. Maximise sound quality deliberately trades some rear null depth for full forward output, so if you are expecting the deepest possible cancellation, switch to Maximise cardioid pattern. Then check that the coverage map frequency is somewhere near what "Cancels at" is reporting, because rejection falls away the further you move from that frequency.
There is a spacing warning above the diagram
The lateral spacing on a broadside or arc-steered design has exceeded the spatial aliasing limit for the reference frequency the check uses, or is close to it. Reduce the spacing between cabinets, or accept that lobing is likely at the higher end of the sub range.
An array type is dimmed with an "Unlock to use" badge
That technique is part of Sub Array Designer Pro. The card stays visible with its full description so you can see what it does, and the unlock card at the top of Settings is where it comes from. See Free and Pro.
A saved design will not reload the way I left it
Saved designs store the fields for whichever array type they were saved as. If a field looks like it has reset to a default, check you are looking at the same array type card you originally opened. The CSA stack and Broadside cardioid array screens in particular share state depending on which checkboxes were ticked at the time the design was saved.
The delay table shows a box as 0.00 ms in grey
That is not an error. It is the reference cabinet, the one every other delay in the design is measured against. Every design has exactly one, and it is the box you do not delay.
The delays all changed and I did not touch the design
Check the temperature in Settings, or whether "Set the speed of sound by hand" has been switched on. Every delay time in the app is derived from the speed of sound, so changing the ambient conditions changes all of them at once. That is working as intended, and it is why the temperature is worth setting properly.
FAQ
Do I need to know which cabinet is "the reference" before I start?
No. The app works it out for you every time. Whichever cabinet ends up with the smallest delay becomes the reference, and it is shown at 0.00 ms in grey.
Which array type should I use?
If you have three subs and not much space, use a CSA stack. If you have plenty of cabinets and stage width, use a Broadside cardioid array. If you have depth in front of the stage, use End-fire, which usually gives the best rejection of the lot. If you are short of stage depth but have width, look at the Castellated array. And if the low end is uneven across a wide audience rather than leaking onto the stage, that is a beam steering problem rather than a cardioid one.
Can I mix array types, such as a curved end-fire array?
Not directly. Each array type is one self-contained technique. Beam steering on top of a broadside cardioid row is the one case where two techniques are deliberately layered together.
What temperature should I use if I do not know the room's?
20 °C, which is the default, is a reasonable indoor assumption. For an outdoor show, use the forecast temperature at showtime rather than what it is when you are rigging. The difference between a cold evening and a hot afternoon is large enough to matter over a long throw.
Is the Pro unlock a subscription?
No. It is a single one-off purchase for this app on this device, and there is a Restore purchase button on the same card for reinstalls or a new handset.
Glossary
- Cardioid array
- An arrangement of subwoofers designed to reject low frequency towards the stage while preserving output towards the audience, using timed and often phase-inverted rear-facing cabinets.
- Attenuation
- How many dB quieter the stage side is than the audience side, at the coverage map frequency.
- Quarter wavelength
- The spacing at which a cardioid pair's cancellation is deepest for a given frequency, and the basis for the "Cancels at" figure.
- Spatial aliasing
- Extra, unwanted lobes that appear in a broadside or arc-steered array's coverage pattern when cabinet spacing exceeds half a wavelength at the frequency being steered.
- Phase invert
- A 180° polarity flip applied to a cabinet, and part of how a cardioid pair achieves its rear cancellation.
- Free field
- An idealised acoustic space with no reflections, ground plane or boundaries. It is the assumption behind every prediction in this app.
- Reference cabinet
- The box in a design that carries no delay, shown at 0.00 ms, against which every other delay is measured.